EVV Configuration
Tip: You can press Ctrl-F on your keyboard to search this topic.
Agencies must determine the functional parameters of EVV confirmation and properly manage information and settings on Patient and Caregiver Profiles. This ensures proper usability and success of EVV.
Agency Setup
EVV confirmation can be made using the following methods:
-
Home Phone Landline: Caller ID
-
Mobile Method: Global Positioning System (GPS)
-
Fixed Object (FOB) /Alternative Device: FOB code
Each method must be activated and set up manually by the Agency on the Agency Profile and Office Setup pages.
Agency Profile
Navigate to Admin > Agency Profile to set up EVV configuration at the Agency level. The system stores up to threee unique phone numbers for every Patient. In the Accept Time and Attendance Call From field, determine which of these phone numbers is to be used for Caller ID-based EVV.

Accept Time and Attendance Call
Office Setup
Navigate to Admin > Office Setup to set up EVV configuration at the Office level, as described in the table below.
|
Field |
Description |
|---|---|
|
Mobile GPS Visit Verification /Tolerance Range (ft) |
Allows Caregivers to place EVVs using the Mobile App. The Tolerance Range (ft) field refers to the acceptable distance from which a Caregiver can make a valid EVV.
If the Tolerance Range is set to
|
|
Mobile Fixed Visit Verification |
Allows Caregivers to enter FOB (Alternative Device) codes using the Mobile App.
Mobile Fixed Visit Verification |
|
Unbalanced Tolerance |
Gives Caregivers a time range for linkable EVV. The Unbalanced Tolerance is set to seven minutes and cannot be changed. This means the Caregiver has seven minutes from the scheduled start time of the visit to place an EVV. If the Caregiver tries to place an EVV outside that time range, the EVV will not link to the visit.
Note: You can change this value at the member level to override this office level setting.
Unbalanced Tolerance |
Tolerance Range and Service Location
The Caregiver must be within the Office’s Tolerance Range of the member’s GPS address in HHAeXchange (for example: within 250 feet) to perform a successful EVV clock in or clock out.
The HHAeXchange+ mobile app displays the user location when clocking in or out and informs the user when they are outside the Tolerance Range. When a clock in or clock out is performed outside the Tolerance Range, the mobile app prompts the user to select an alternate service location (for example: Family Home, Neighbor Home, or Community).
If the Caregiver is outside the Tolerance Range but indicates they are at the Patient Home, the mobile app flags the visit as an EVV exception and sends it to the Call Dashboard for review.
Patient Setup
When a Caregiver Clocks In or Out, the system verifies the EVV based on information maintained on the Patient’s General and Profile pages. Follow the steps below to enter and maintain Patient confirmation information.
|
Step |
Action |
||||||||
|---|---|---|---|---|---|---|---|---|---|
|
1 |
Navigate to Patient > General and select the Edit button. |
||||||||
|
2 |
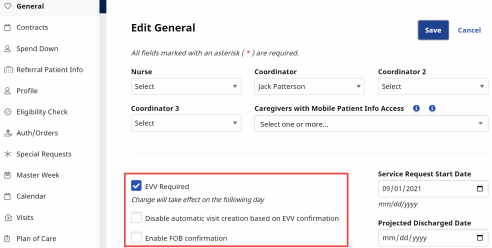
The EVV settings are in the General section as shown below and described in the following table.
EVV Setup in Patient General Page
|
||||||||
| 3 |
Select the Patient’s Profile page (from the left nav) and go to the Address section. |
||||||||
| 4 |
Complete the Patient’s demographic information. Multiple Addresses can be entered for a Patient as a GPS-enabled Address Type (as seen in the image). Verify that all addresses are accurate, as the system uses these values to validate EVV confirmations.
Patient Profile GPS Enabled Patient Addresses |
||||||||
| 5 |
For other forms of EVV, the Patient Phone Number(s) is used to confirm an EVV. Verify the Phone Number Information on the Patient Profile.
Patient Profile – Patient Phone Number Information Refer to the Tracking Location Where EVV is Performed topic for full details on linking a Patient Phone Number to an EVV method. |
Caregiver Setup
Caregivers must enter their Time & Attendance PIN (Assignment ID) to verify their identity whenever placing an EVV (using an approved phone). This allows the system to match their call with the proper visit.
In the HHAeXchange+ Mobile App, the Provider generates an Activation Code in the Caregiver Profile. The Provider sends the Activation Code to the Caregiver to complete their Mobile App registration.
In the Caregiver Profile, select Clinical to allow the Caregiver to review the Patient’s medical and clinical information if they have been granted access to this information. The Caregiver cannot view any medical or clinical information if Non-Clinical is selected.


